Natural Scene Designer Pro 7.0 |
||||||||||
Tom Patterson |
||||||||||
Natural Scene Designer (NSD) Pro 7.0 for Mac and Windows offers a slew of new features for creating 3D scenes and maps. These are my favorites, including a few tips on their use. |
||||||||||
1) SVG export to Adobe Illustrator |
||||||||||
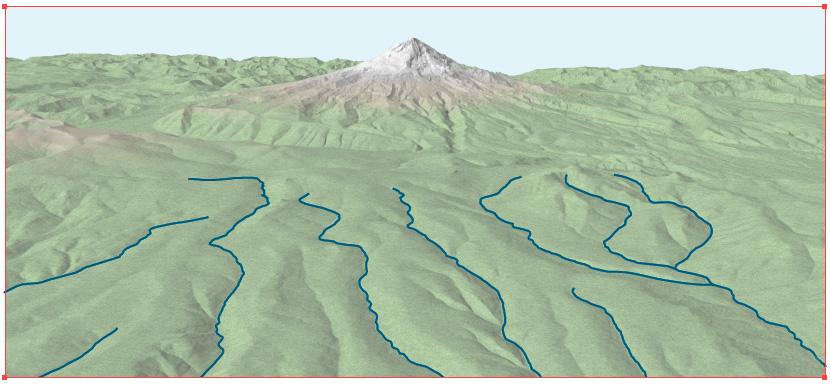
Combining map vectors and 3D terrain art is very easy in NSD Pro 7.0. Selecting the "Create SVG Files for Shapes" option when saving a rendered 3D scene or plan oblique relief saves all shapefile overlays in your NSD file as Scalable Vector Graphic (SVG) files. The SVG files open in Adobe Illustrator as editable lines aligned with the 3D terrain surface, such as the blue streams in the example below. Bounding boxes included with the SVG files (shown in red below) match the extent of the rendered 3D art. To register an SVG file with placed terrain art in Illustrator, simply select everything in the file, drag one of the bounding box corners, and snap it to the corresponding corner of the terrain art. SVG export in NSD Pro 7.0 works with both line and point shapefiles. The program automatically breaks lines that go behind high terrain. |
||||||||||
 |
||||||||||
2) Multiple Lights |
||||||||||
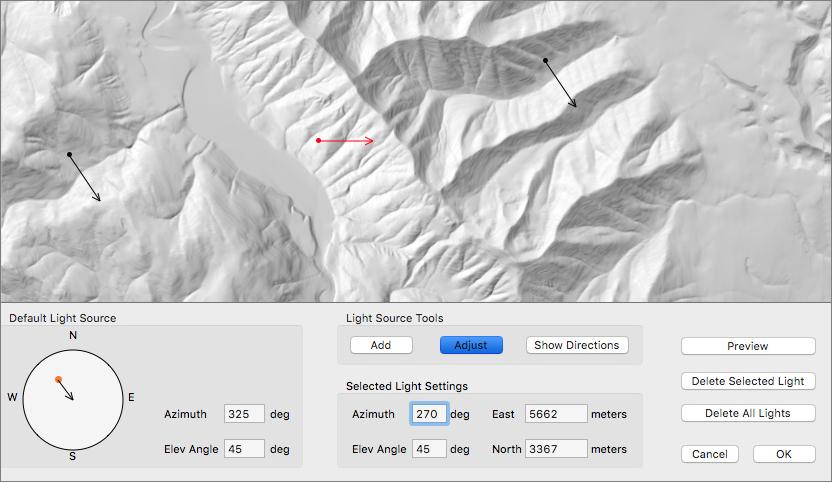
Using a uniform light source from the northwest is not always the best solution for depicting all features on a shaded relief. To improve the appearance of tricky terrain features, NSD Pro 7.0 now gives you the option to add multiple lights on a relief. You can adjust the azimuth and elevation angle of each light. The example below shows standard northwest lighting (black arrows) supplemented with west lighting (red arrow) to better depict a northwest trending ridge. To adjust a light, press the adjust button and then select a light. Click-drag the arrow to move it. Click-drag the tip to rotate the azimuth. Dragging the tip forward or backwards lowers or raises the elevation angle. Tip: changing the elevation angle will lighten or darken the relief around the light, a result that you may not want. Holding down the shift key when rotating an arrow will prevent the elevation angle from changing. You can add as many lights as you want to a relief. Each new light influences its immediate surroundings. NSD 7.0 interpolates the influence of multiple lights in the areas between lights. Clicking the "Show Directions" button and moving your cursor over the relief reveals interpolated light directions everywhere. Multiple lights also work with 3D terrain and planimetric oblique relief. |
||||||||||
 |
||||||||||
3) Texture Shading |
||||||||||
Texture shading is now a built-in rendering option in NSD Pro 7.0. To learn how texture shading can enhance relief presentations, go to this page. |
||||||||||
 |
||||||||||
4) Terrain Editing |
||||||||||
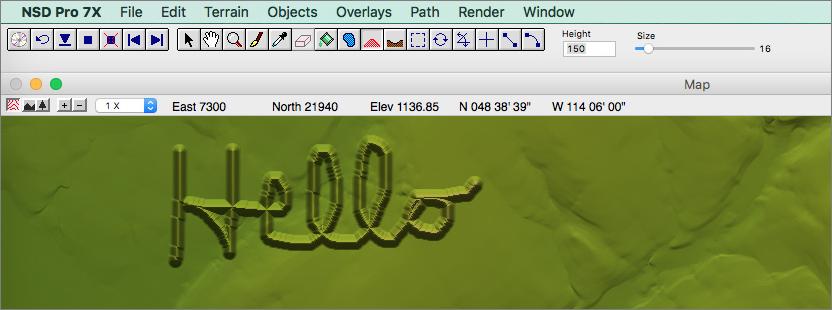
NSD Pro 7.0 has improved Raise the Terrain/Lower the Terrain tools. It is now possible to paint on a terrain with continuous brush strokes much as you would when editing an image in Photoshop. The tools also use Photoshop keyboard shortcuts. Press the "x" key to toggle between raising and lowering the terrain. Pressing the "[" and "]" keys decreases and increases the brush size. The height setting allows you to raise or lower terrain by specified amounts in meters when applying brush strokes. In the example below, my writing is 150 meters higher than the surrounding terrain. |
||||||||||
 |
||||||||||
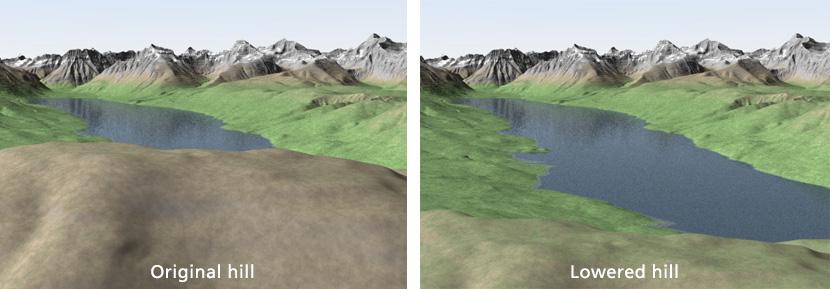
Editing terrain has practical applications. Before using the Create a Lake tool, to avoid also filling the valley downstream of a lake, draw a low dam at the lake outlet. To depict a ski mountain higher than it actually is (the accepted practice for this type of mapping), increase its height. And you can lower foreground features that obscure a scene's background. In the example below, I have lowered a hill (left image, bottom) to reveal more of the lake behind it (right image). Tip: For best results when editing a terrain, add or remove elevation by small amounts with a large brush. Watch the terrain change incrementally in the camera window as you simultaneously draw in the map window. |
||||||||||
 |
||||||||||
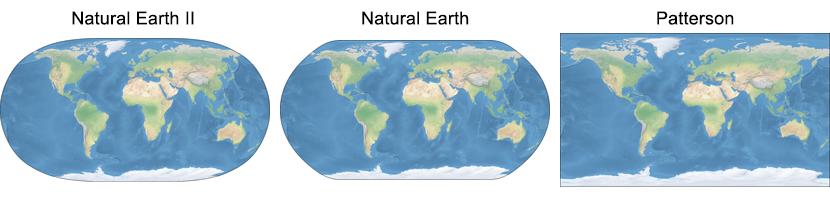
5) Map Projections |
||||||||||
Along with the Natural Earth projection introduced in version 6.0, NSD Pro 7.0 now includes the Natural Earth II and Patterson world map projections, which for obvious reasons I really like ;) |
||||||||||
 |
||||||||||
6) Background Tree Editor |
||||||||||
Tree masks are now transparent allowing you to see the terrain, draped images, and shapefiles when editing where NSD places virtual trees. Use this feature to clear trees from roads, trails, ski runs, streams, etc. |
||||||||||
 |
||||||||||
7) Render Masks |
||||||||||
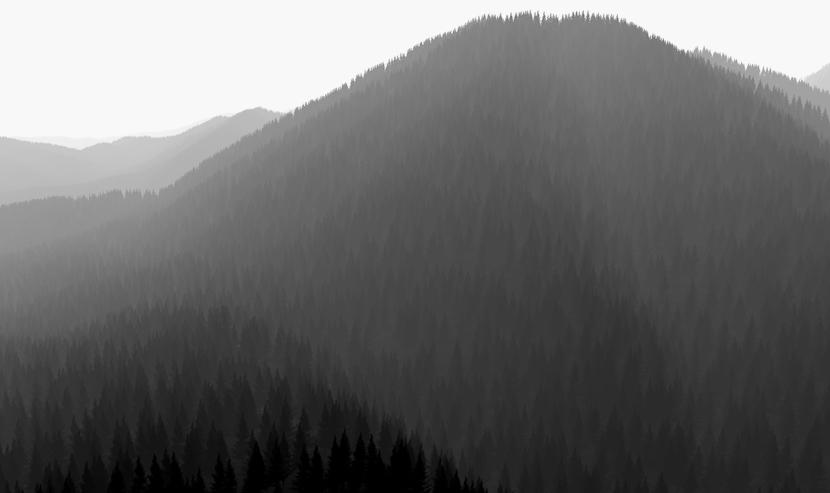
Sky, height, and distance masks of 3D scenes now include background trees. Use these grayscale masks in Photoshop for adding haze and custom skies to your scenes. Distance masks (see example below) have a mysterious beauty just by themselves. Tip: For best results when rendering masks, set anti-aliasing to 0, maximum levels to 32, and render the masks much larger (2X to 4X) than your final scene file. Resize the masks afterwards in Photoshop (with bicubic interpolation). |
||||||||||
 |
||||||||||
8) Miscellaneous |
||||||||||
Other new features and improvements include: • Import IMG DEM • Improved TIF DEM import • Retina Display support • Ray Trace previews in the Camera View window • New "void" filling function in the Terrain menu |
||||||||||