 |
|||||||||||||||
Landsat 8 Photoshop Tutorial |
|||||||||||||||
Natural color |
|||||||||||||||
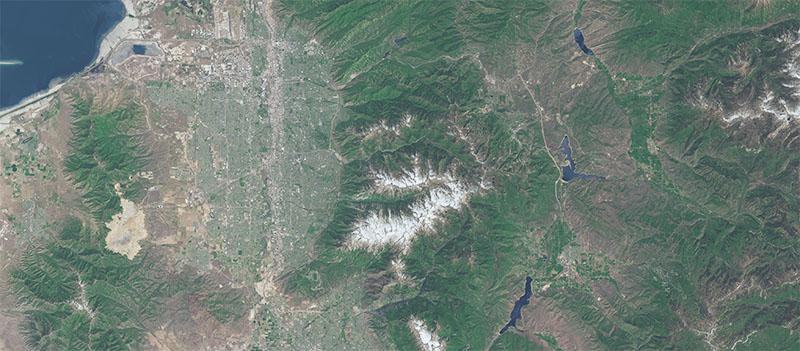
Landsat 8 bands 4, 3, and 2 correspond to the red, green, and blue portions of the visible spectrum. Combining these bands as RGB channels in Photoshop and making curves adjustments produces an image that approximates the natural colors of Earth when seen from high above (Figure 5). |
|||||||||||||||
 |
|||||||||||||||
Figure 5. Salt Lake City and the Wasatch Range, Utah, in natural color. |
|||||||||||||||
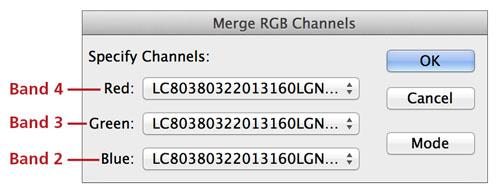
Procedure 1) Open bands 4, 3, and 2 of your scene as separate files in Photoshop. They will appear dark gray. If your computer has limited RAM, change the bit depth (Image/Mode) from 16 bits to 8 bits per channel for each band. This will reduce the file sizes by one half. 2) Go to the Channels palette (Window/Channels). In the fly-out menu in the upper right select Merge Channels. 3) In the Merge Channels palette select RGB as the mode and keep the number of channels as three. Select band 4 for the red channel, band 3 for the green channel, and band 2 for the blue channel. Click OK to combine the bands as a single RGB Photoshop file (Figure 6). 4) A dark and unappealing file will result. Save it. |
|||||||||||||||
 |
|||||||||||||||
Figure 6. Merging bands 4, 3, and 2 to create a composite RGB image. |
|||||||||||||||
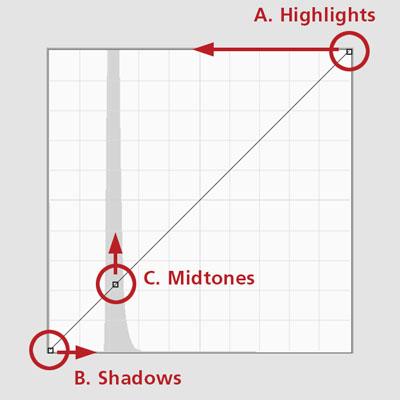
4) The next step is adjusting the tonal range of the merged RGB image. The Curves dialog in Photoshop (Image/Adjustments/Curves) provides the most control for doing this. Most images require a slightly convex curve fitted more closely to the image histogram than the straight line default curve. 5) Start by dragging the highlight and shadow control points inward (Figure 7, A and B). Then place another control point near the middle of the image histogram and move it up slightly. This will lighten the midtones in the image (Figure 7, C). Adjust the position of the three control points and add more control points as needed until the image looks right. Note that in this step you should be adjusting all three RGB channels together and not as individual channels. |
|||||||||||||||
 |
|||||||||||||||
Figure 7. Curves adjustments to the merged RGB image. |
|||||||||||||||
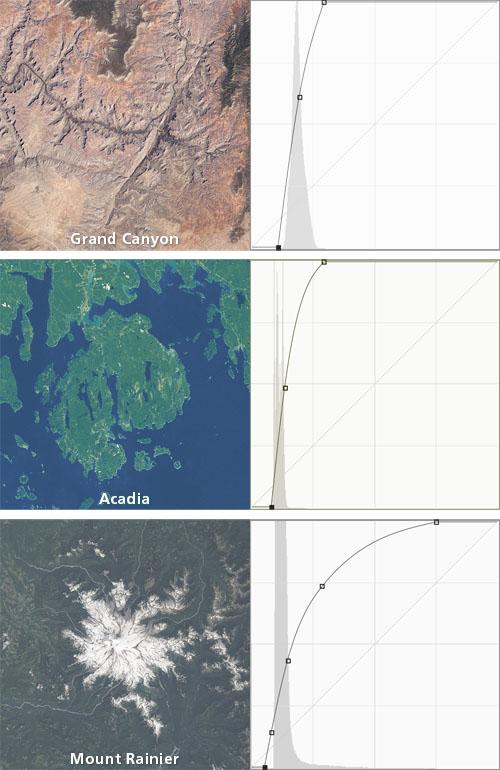
6) The curve that you create depends on the tonal characteristics of the image. The examples below are different curves applied to images of US national parks (Figure 8). The Grand Canyon curve has minimal convexity because the desert landscape is relatively light. By comaprison, the darker forests and waters of Acadia require a little more midtone lightening. The Mount Rainier curve is flattened in the highlights to prevent the snowy summit from becoming blown out. |
|||||||||||||||
 |
|||||||||||||||
Figure 8. Curve adjustments applied to different Landsat 8 scenes. |
|||||||||||||||
Tips 1: In the curves dialog you can also adjust the red, green, and blue channels individually to shift the cast of the image as subtly or dramatically as you want. But be careful. An adjustment that fixes one part of an image can create problems elsewhere. Tip 2: If you plan to create a mosaic with two or more Landsat 8 scenes, maintaining color consistency is critical. Save your curves adjustment as a preset—use the preset options button at the top right of the curves dialog—and load it to apply to subsequent scenes. |
|||||||||||||||