Making 3D Terrain Maps |
||||||||||
--Selective Vertical Exaggeration (and lowering) |
||||||||||
Sometimes applying vertical exaggeration consistently to all parts of a terrain is just not enough. For example, 3D ski area maps commonly exaggerate the mountain with the ski area to dominate everything around it—puny hills thus become Alps. Not all uses of selective vertical exaggeration need be so radical. The maps below feature Mauna Loa, Hawaii, a sprawling volcano rising to 13,679 feet (4,169 meters), and the most massive mountain on earth by volume. However, looking at the map on the left, Mauna Loa appears insignificant even with 200% vertical exaggeration applied everywhere on the island. The map on the right remedies this by applying extra vertical exaggeration to the summit and adjacent slopes. The rest of the island is unmodified. |
||||||||||
 |
||||||||||
Mauna Loa, Hawaii, before (left) and after (right) selective vertical exaggeration. |
||||||||||
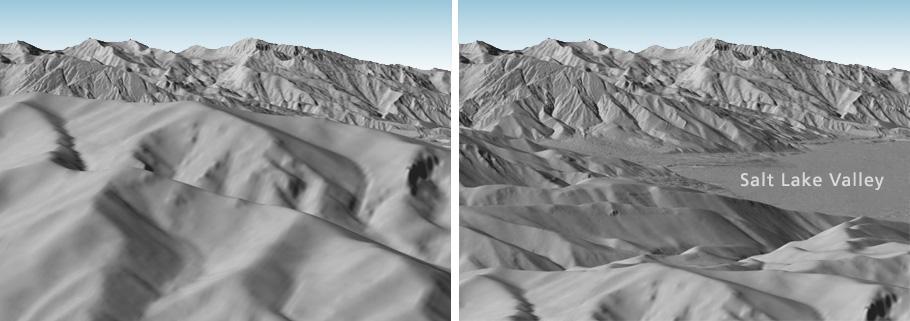
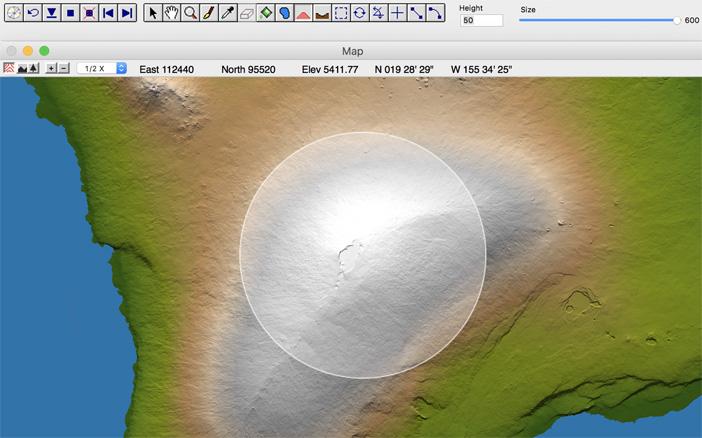
I raised the elevation of Mauna Loa in Natural Scene Designer Pro with the "Raise the Terrain" tool. With a large brush I painted with a succession of strokes on Mauna Loa in the map window. With each stroke that applied 50 meters of elevation gain, I watched the summit slowly getting higher in the camera window. I stopped brushing when it looked about right. Natural Scene Designer Pro also offers a “Lower the Terrain” tool that works just like the “Raise the Terrain” tool, but in the opposite direction. With this tool you can selectively lower high foreground terrain that obscures the background in a scene. Because selectively raising or lowering terrain distorts map accuracy, I turn to these tools only as a last resort. For example, to show the Salt Lake Valley in the example below, I would first try raising the camera to a higher altitude, tilting the camera down, changing the camera position, and, then, if these actions were not enough, lowering the foreground terrain by a modest amount. |
||||||||||
 |
||||||||||
Wasatch Range adjacent to Salt Lake City, Utah. Selectively lowering the mountains in the foreground reveals the flat Salt Lake Valley. |
||||||||||
 |
||||||||||
Russell Cave National Monument, Alabama. NPS cartographer Joe Milbrath lowered terrain in the foreground to reveal the entrance road intersection. The black dotted line shows approximately where the original hill was. (Click map to enlarge.) |
||||||||||
Terrain editing tips • Avoid raising or lowering terrain near coastlines. If you should brush over a water body, it will no longer be flat and will not fill properly. • Use large brushes big enough to raise or lower an entire mountain. Painting with small brushes tends to create uneven surfaces. • Be patient. When using large brushes on large terrains, there is a time lag between your brush strokes in the map window and seeing the results in the camera window. • Applying a series of small, incremental elevation edits gives you more control than a single large edit. • Work with a copy of your original terrain. Natural Scene Designer Pro has only one undo. If you mess up badly while editing a terrain, revert to saved and start over. |
||||||||||
 |
||||||||||
Using the Raise the Terrain Tool in Natural Scene Designer Pro to increase the elevation of Mauna Loa, Hawaii. Each brush stroke increases the elevation within the white circle by 50 meters. |
||||||||||
 |
||||||||||