Making 3D Terrain Maps |
||||||||||
--Valley Fog (and smog) |
||||||||||
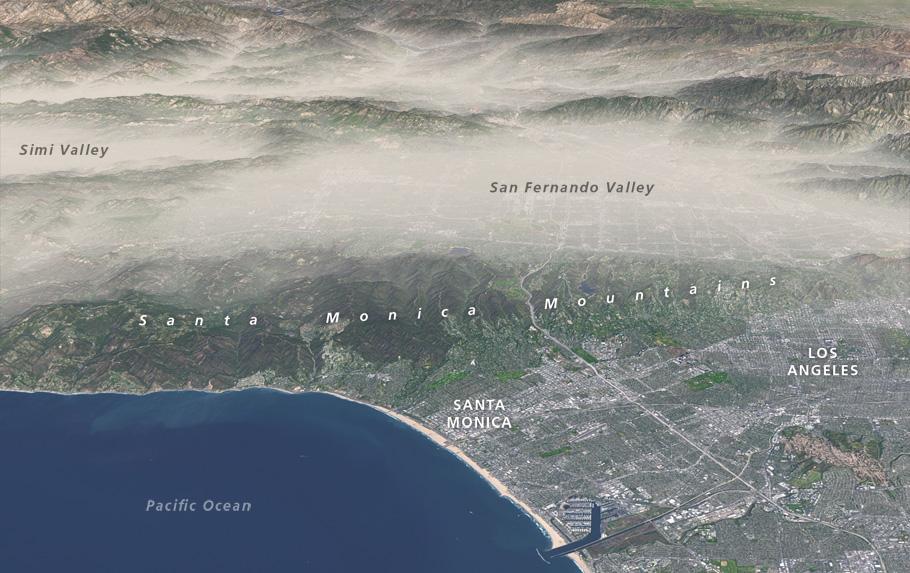
Next up is a technique for simulating valley fog, mist, and air pollution on 3D terrain maps. In the Los Angeles example below, I applied a layer of brown-tinged smog to the urbanized valleys away from the coast, with tendrils reaching into the distant mountains. The smog is semi-transparent, revealing just a hint of the freeways and built-up areas below. By contrast, foreground areas along the coast are crystal clear. Why use this technique? In the case of Los Angeles, including smog in the scene makes an obvious socio-environmental statement. Pity the people who don't live along the coast. However, had I instead filled the inland valleys with wispy white fog, our perception would change. We would see these areas as more desirable—cleaner, cooler, and moister. Alternatively, to turn the tables, I could have shrouded the coast in gray "June gloom" mist. A layer of valley haze, although nasty in real life, brings graphical benefits to 3D terrain maps. I made the Los Angeles scene by draping a Landsat 8 image on a digital elevation model. Without concealing haze, the inland valleys would look bad because of land cover textures that combine jarringly with complex terrain. Other benefits include mountains that emerge through the haze layer making it easier to distinguish highlands from lowlands. And the valley haze enhances 3D depth within the scene, unambiguously differentiating the background from the foreground. |
||||||||||
 |
||||||||||
Bad air day: Los Angeles, California, with simulated smog. |
||||||||||
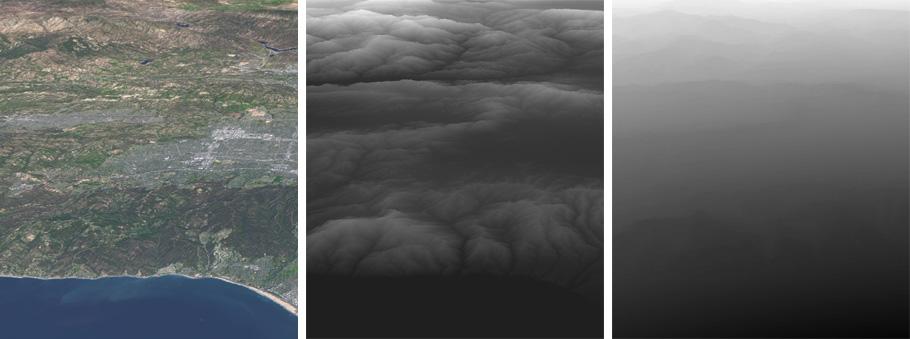
Technique 1) In Natural Scene Designer Pro, render and save three different images of your scene, including a ray-traced terrain, height mask, and distance mask (see illustration below). Look for these rendering options in the Render/Render Picture menu. 2) Open the three images in Photoshop. The terrain image will be your working file. 3) Create a new "fog" layer above the terrain and fill it with white. 4) On the fog layer, create a layer mask. 5) Copy and paste the height mask into the fog layer mask. (Option-click on the layer mask icon in order to paste into it.) 6) With the layer mask active, invert the height mask so that low areas appear lighter and high areas appear darker. The height mask controls how much white fog covers the terrain. Initially you will see a gauzy curtain of white, slightly denser in the lowlands, over the entire terrain. 7) With the layer mask active, use a Curves or Levels adjustment to control the fog density and the maximum elevation where it occurs. This is a little tricky. Experiment. 8) To remove fog from the foreground (if desired), you have three options: • Select a very large, soft brush and paint black in the layer mask to remove the fog. Set the blending mode to multiply and use a low opacity do this gradually. • Use the gradient tool in the layer mask to remove fog. Select a linear gradient with black as the foreground color and white as the background color. Like before, set the blending mode to multiply and use a low opacity to remove the fog gradually. • Use the distance mask that you rendered to mask the contents of the fog layer mask. This will involve copying and pasting both the distance mask and fog layer mask into a temporary new file. Place the distance mask in multiply blending mode above the fog layer mask. Use a Curves or Levels adjustment to choke the distance mask so that little or no fog appears in the foreground. Flatten the temporary file. Then copy and paste the now choked fog mask back into layer mask on your original file with the terrain. Getting satisfactory results may take several tries, so be sure to make copies of your files. |
||||||||||
 |
||||||||||
Fog making components. (Left) Ray-traced terrain. (Middle) Height mask. (Right) Distance mask. Click here to download a layered Photoshop file containing these components to practice with. |
||||||||||
Last but not least, a shout out to Charles Preppernau for discovering the valley fog techique and sharing it at the 2016 NACIS Conference in Colorado Springs. You can check out his "Mapping Yellowstone Caldera" presentation slides here. |
||||||||||
 |
||||||||||