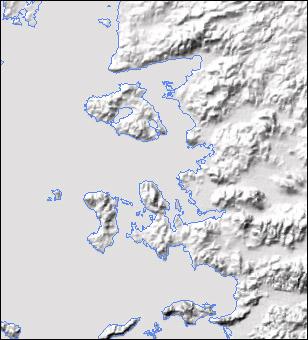
Geocart ouput: This 1: 2,627,000-scale map of the Aegean shows full-resolution GTOPO30 shaded relief and a coast from Digital Chart of the World in the Albers Equal-Area Conic projection.
Overview
Geocart, the versatile map projection application for Macintosh, can be used to project user defined chunks of GTOPO30 global relief data. This brings significant benefit to cartographers. Medium-scale customized maps can be created in any projection with vector lines and raster shaded relief in precise registration. However, the procedure for importing GTOPO30 into Geocart is convoluted and time consuming, especially when attempted for the first time. The instructions on this page are intended to guide you through the process as quickly as possible.
Note: Terra Data, Inc., the creators of Geocart, sells GTOPO30 data bundled with an easy-to-use import utility.
Photoshop preparation
Geocart can not read GTOPO30 directly. Photoshop must be used to translate GTOPO30 elevation data to the raw raster format that Geocart converts to an image database. Depending on your mapping needs, the GTOPO30 data used in Geocart will probably be a grayscale DEM or shaded relief. For instructions about opening and manipulating GTOPO30 in Photoshop, plus a link to a free GTOPO30 data site, go to: http://www.nacis.org/cp/cp28/gtopo.html
1) When your GTOPO30 image is ready to be used in Geocart, open the image in Photoshop and note the following information:
Image size in pixels (Image/Image Size).
Boundaries: The latitude and longitude of each side of the image.
Determining latitudinal and longitudinal extent of GTOPO30 images is straight forward, even when multiple images have been composited and/or cropped, if you pay careful attention to editing in Photoshop. GTOPO30 tiles are named according to longitude/latitude of their upper left corners and cover 40 degrees of longitude by 50 degrees of latitude. The tiles measure 4800 pixels wide x 6000 pixels high (except for Antarctica), which translates to 120 pixels (height samples)/degree. Therefore, if 480 pixels are trimmed from the right side of an image, the longitude of that side shifts 4 degrees to the west. Pixels can be precisely trimmed from selected sides of an image by using the Canvas Size dialog (Image/Canvas Size). Keep GTOPO30 images at 72 dpi--it is the only resolution Geocart recognizes.
World map showing GTOPO30 coverage
2) Make sure that RGB mode is selected (Image/Mode/RGB) and save the GTOPO30 image file in Raw format (File/Save a Copy). When a dialog box appears, enter:
File Type: GeoR
File Creator: GeoC
Header: 0
Save Image in: Interleaved Order
Converting to a Geocart image database
1) Geocart can read raw raster format, but only after the GTOPO30 image has been converted to a Geocart image database. First, you must create a host map in Geocart that shares identical scale, boundaries, and projection properties as the GTOPO30 image to be converted. It doesn't matter if line work appears on the host map, for now.
Information you need to know:
Nominal Scale: 120 pixels/degree (unless resampled).
Boundaries: The latitude and longitude of the sides of your image.
Projection: Plate Carrée (a.k.a. cylindrical equidistant projection,
geographical projection, unprojected data, or gridded data).
Projection Center: Anywhere on the equator.
Ellipsoid Datum: GRS 80/WGS 84
2) Your map should appear as a rectangle. If the sides are not parallel, the projection center is probably not on the equator. Because of GTOPO30s large scale, chances are the margins will extend beyond Geocarts document window. Don't worry about this for now.
3) You are now ready to convert the GTOPO30 image to a Geocart image database. Select File/Convert to Database. When the dialog box appears for saving the file with a .RAW suffix, give the file a name and click okay. Another dialog box appears asking for information about the GTOPO30 image:
Horizontal and vertical pixels refer to the dimensions of your image.
Enter 120 Pixels per degree.
Leave the x and y settings at 0, which represent the default pixel
origin in the upper left corner.
Enter the latitude and longitude value for the upper left (northwest)
corner of your image.
4) Click okay and go have lunch, since processing can take awhile. When finished, the GTOPO30 image can be brought into Geocart like any other database by going to File/Databases.
Rendering GTOPO30 in Geocart
When Geocart draws a vector map, all data within the map boundaries can export to other applications, even when the map area extends beyond the default (page size) document window. Image databases work differently. The entire image must fit inside the document window for intact export. Because Geocart operates at screen resolution (72 dpi), document sizes can be very large. Fortunately, the document window can be enlarged to fit large images by going to File/Document Layout. The easiest method is to adjust the pixel dimensions of the document to be slightly larger than the image itself. For example, if your image database measures 2,000 x 3,000 pixels, change the document size to 2,100 x 3,100 pixels. Finally, select Map/Center in Document and check whether your map falls completely within the document window.
Before rendering the final image, remove all vector lines from the map to prevent pixellated lines from appearing on the image. Go to File/Databases to delete vector databases and Map/Graticule to remove the graticule. Geocart can take a long time to render large images. Go enjoy a multiple course dinner while Geocart works...
Exporting GTOPO30 from Geocart
Exporting rendered images from Geocart is simple. Select File/Export and choose the EPSF or PICT option. Both file formats display images with identical quality and can be opened in Photoshop with ease. The only difference is the 4,000-pixel width limit of the PICT format. After making your choice, a second dialog then appears, select 72 dpi as the output resolution. Go have a restful night of sleep while Geocart works some more...
Additional thoughts
Maximizing resolution: Some map projections, such as the Albers Equal-Area Conic projection, rob GTOPO30 of its native resolution of 120 pixels/degree. Converging lines of longitude severely compress (i.e. delete) pixels at high latitudes. For example, on a map of the conterminous USA, the Albers Equal-Area Conic projection diminishes GTOPO30 pixel density by about 20% when compared to the Plate Carrée projection. To compensate for pixel erosion, perhaps output resolution should be increased when exporting from Geocart.
1:250k USGS DEMs: The general procedure outlined above works with 1:250k DEMs, which also carry the Plate Carrée projection and GRS 80/WGS 84 ellipsoid datum. The resolution of 1:250k DEMs is 1201 pixels per degree (edge pixels straddle the bounding lines of latitude and longitude). If multiple DEMs are mosaicked, remember that there is one pixel overlap on all four sides.