GTOPO30 digital elevation data covers most terrestrial areas of the planet at one kilometer resolution. The data are provided in 33 contiguous tiles that cover 50 degrees of latitude by 40 degrees of longitude. The exception is Antarctica where coverage measures 60 degrees of latitude by 30 degrees of longitude. Each tile is named according to the latitude/longitude coordinates of its upper left hand corner.
Obtaining GTOPO30:
![]() Click
here to place an online order for GTOPO30 from the USGS.
Click
here to place an online order for GTOPO30 from the USGS.
GTOPO30 is provided on CD-ROM's which the USGS will mail to you for free, including the postage. Delivery takes about a week and half. Five CD-ROM's are needed for coverage of the entire world. GTOPO30 can also be downloaded from the USGS site. However, for some unknown reason, the downloaded DEM's do not open properly in Photoshop. Opening GTOPO30 from the CD-ROM's is not a problem.
Opening GTOPO30 in Photoshop:
1) Launch Photoshop. Go to the File/Open in the pull down menu (Command O) and select a DEM (look for a .DEM suffix) to open from the CD-ROM. In the Open dialog box make sure that the "Show All Files" option is clicked. The DEM must be opened in "Raw" format. Each GTOPO30 DEM tile is 54.9 MB in size.
2) The Raw Options dialog appears. Mac and Windows users should enter
the values shown in the illustration below, including the Mac "Byte Order"
for Windows computers. Mac users can open DEM's directly from the CD-ROM.
Windows users must copy the DEM to their hard drive and rename it with
a .raw extension. Note: The dimensions of GTOPO30 tiles are 4800 pixels
wide by 6000 pixels high, except for the Antarctic tiles which measure
7200 pixels wide by 3600 pixels high.
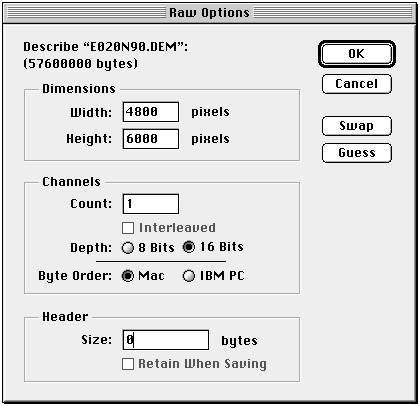
GTOPO30 opens in Photoshop as a 16-bit raw raster file.
3) After awhile a high contrast image opens showing water as white
and land as dark gray. Adjusting Levels will convert the high contrast
image to a grayscale DEM. Accomplish this by going to Image/Adjust/Levels
in the pull down menu (Command L). A histogram appears showing the elevation
data compressed together on the left side. Drag the highlight adjustment
(the hollow triangle) for "Input Levels" left to the right edge of the
compressed data. Grayscale elevations (dark is low, light is high) should
begin to appear in the DEM.
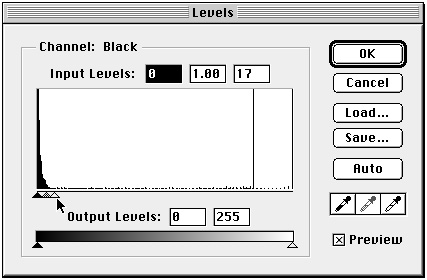
Drag the highlight adjustment for Input Levels to the left. Do not
change any other settings!
4) Moving the Input Levels highlight slider changes the numerical value
in the box above histogram (look for the box reading "17" in the illustration
above). Selecting the highlight value is very important and depends on
the the maximum elevation of the DEM. A highlight value that is too low
truncates prominent peaks. A highlight value that is too high diminishes
topographic detail. The list below shows the optimal highlight values for
each GTOPO30 tile:
GTOPO30 Tile Optimal Highlight Value (Input Levels)
W180N90 25
W140N90 19
W100N90 11
W060N90 17
W020N90 19
E020N90 23
E060N90 29
E100N90 17
E140N90 19
W180N40 18
W140N40 18
W100N40 27
W060N40 12
W020N40 17
E020N40 24
E060N40 35
E100N40 29
E140N40 19
W180S10 9
W140S10 5
W100S10 28
W060S10 13
W020S10 12
E020S10 15
E060S10 12
E100S10 7
E140S10 14
W180S60 17
W120S60 20
W060S60 15
W000S60 15
E060S60 16
E120S60 8
5) The last step is to switch from 16 Bits/Channel to 8 Bits/Channel.
Accomplish this by going to Image/Mode in the pull down menu. Save the
file. It should reduce to about 21 MB in size.
Oceans:
Oceans appear as white on GTOPO30 DEM's. This is undesirable, since
oceans are generally the lowest areas on a grayscale DEM and should be
represented by black instead of white. There is a simple solution to this
problem. Use the magic wand selection tool (tolerance set to 0) to select
the ocean. To increase the selection to include all water areas, choose
Selection/Similar in the pull down menu. Next, expand the selection by
two pixels by going to Selection/Modify/Expand in the pull down menu. For
the last step, go to Edit/Fill... in the pull down menu and fill the selected
oceans with black. Note: Be careful not to inadvertently select highlands
while selecting the ocean with the magic wand. If this does happen, the
highlands can be removed from the selection by holding down the Option
(Mac) key and circling selected highland areas with the lasso selection
tool.
Land Below Sea Level:
Lands that are below sea level do not display properly when GTOPO30
DEM's are prepared by the technique described above. Below sea level lands
appear as white, similar to water bodies, and do not show depth.
Mosaicking Tiles:
Multiple GTOPO30 tiles can be copied and pasted together in Photoshop
to build DEM's of larger areas. There is one prerequisite. To assure even
edge matching between mosaicked tiles, the tiles must be saved with a identical
(Levels) highlight value. The highlight value used for a set of mosaicked
DEM's equals that of the loftiest DEM in the set. For example, when building
a DEM of the entire world, all 33 tiles must be saved with a highlight
value of 35 which is the value of the tile containing Mount Everest.
![]() Click
here to learn about a relief creation technique using Photoshop 4.0
Click
here to learn about a relief creation technique using Photoshop 4.0
![]() Click
here to learn how to use GTOPO30 in Geocart 2.6
Click
here to learn how to use GTOPO30 in Geocart 2.6