Making 3D Terrain Maps |
||||||||||
--False Horizon and Sky |
||||||||||
Fitting the horizon and sky into 3D terrain maps is a problem with 3D software, including Natural Scene Designer Pro. On maps viewed from a high elevation and with a steep camera pitch, the horizon is nowhere to be seen. Only when the virtual camera is moved down and given a shallow pitch will the horizon sneak into your scene. But such extremely oblique scenes hardly qualify as maps. Fortunately, you can force fit the sky into almost any 3D scene, even those viewed from up high. These are the four techniques that I use to create and modify skies: 1) Terrain truncation This quick Photoshop technique works best in scenes rendered with shallow or intermediate camera pitches. In the Flight 93 example below, the elevation data truncates on the far side of the low background hills, creating a false horizon at the ridge tops. Above this convenient break, I patched in a sky gradient using Photoshop. Take note that this technique works only when the view direction is perpendicular to the rectangular chunk of terrain loaded in Natural Scene Designer Pro. Otherwise, an uneven horizon will result. The addition of background haze helps unify the terrain and sky. As a side note, if the Flight 93 elevation data had extended outward indefinitely, the true horizon calculated by Natural Scene Designer Pro would be far away and higher up on the page, probably in this text. |
||||||||||
 |
||||||||||
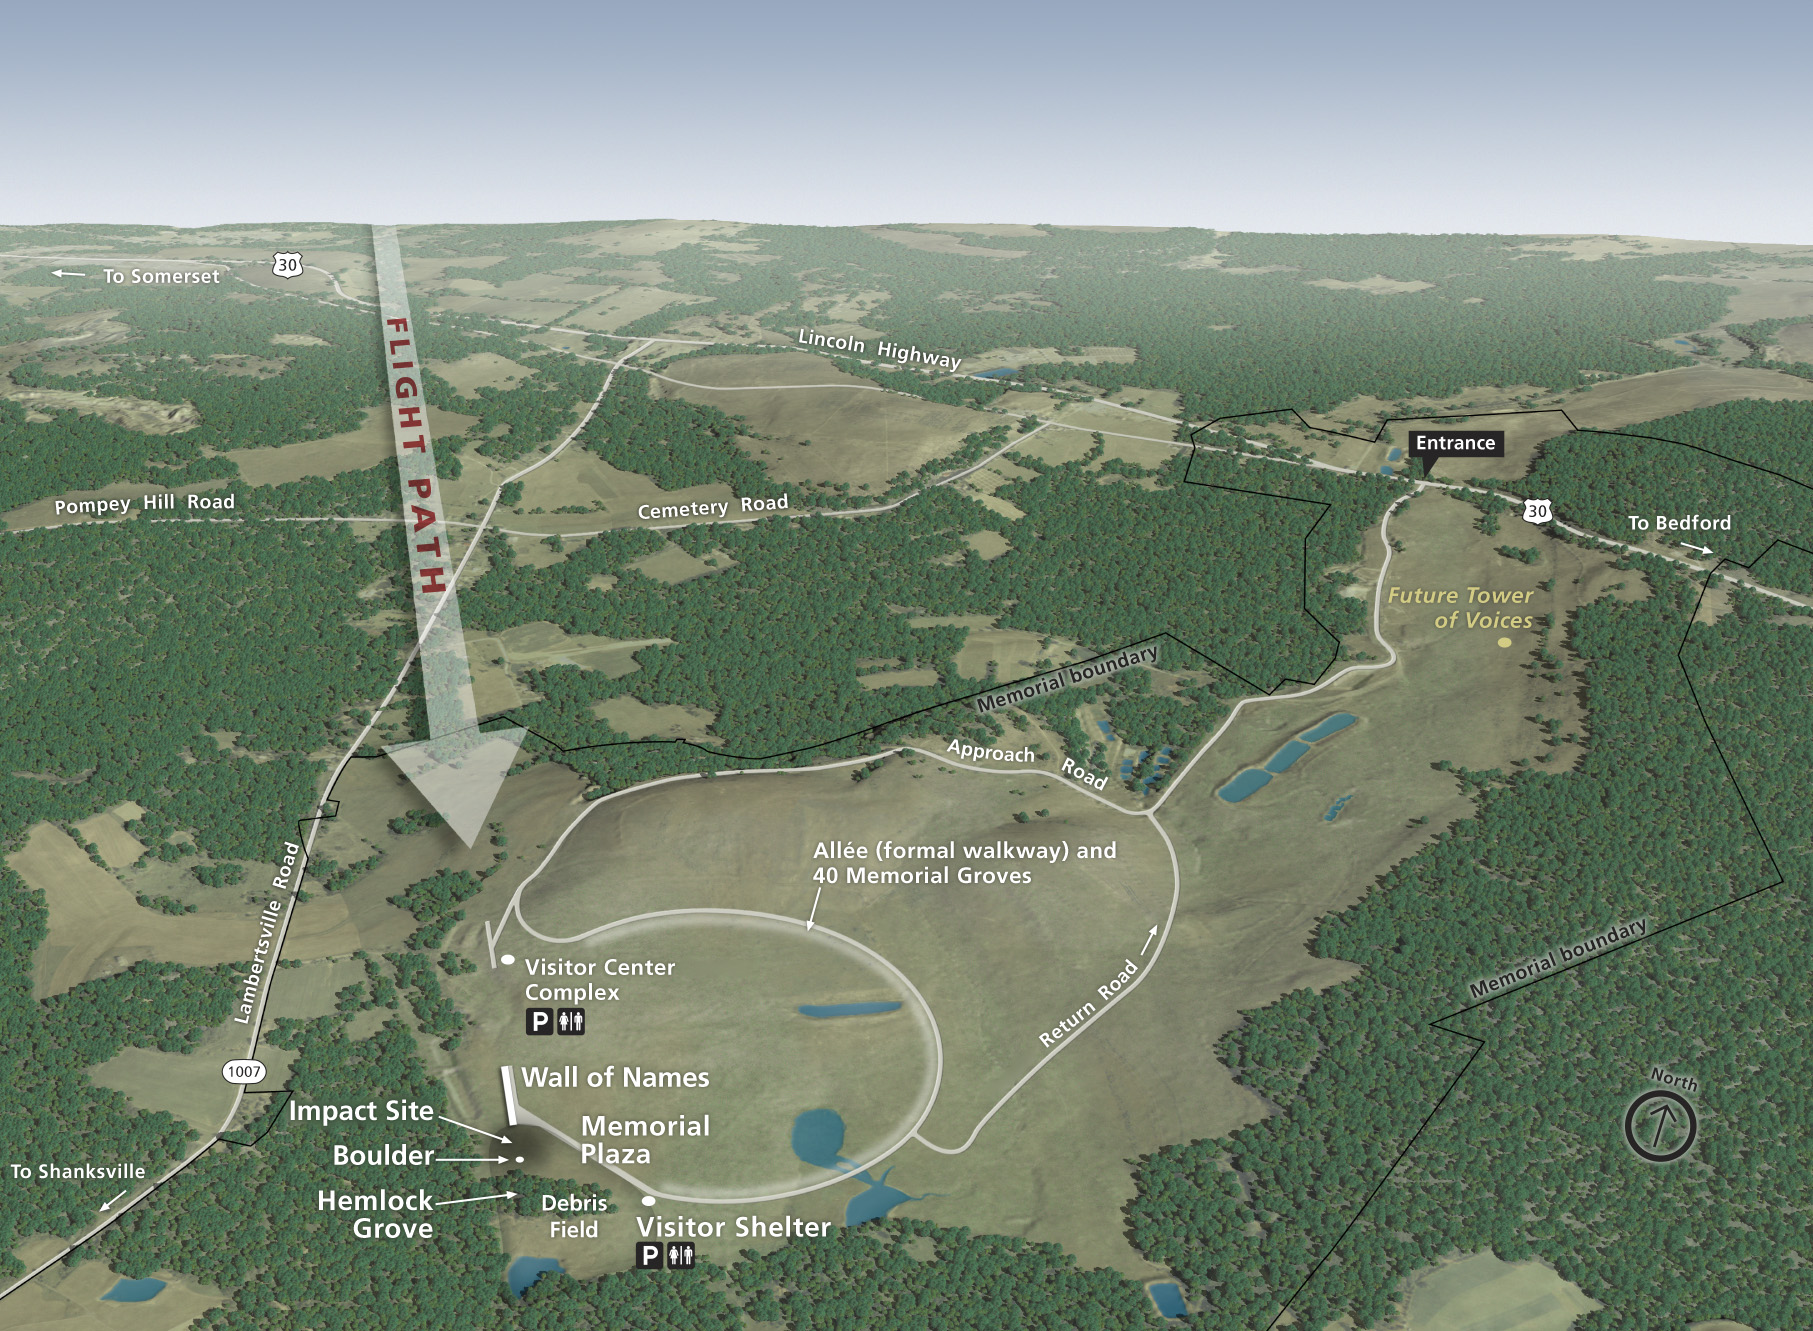
Flight 93 National Memorial, Pennsylvania. The back edge of the digital elevation model serves as a false horizon in this scene. (Click map to enlarge.) |
||||||||||
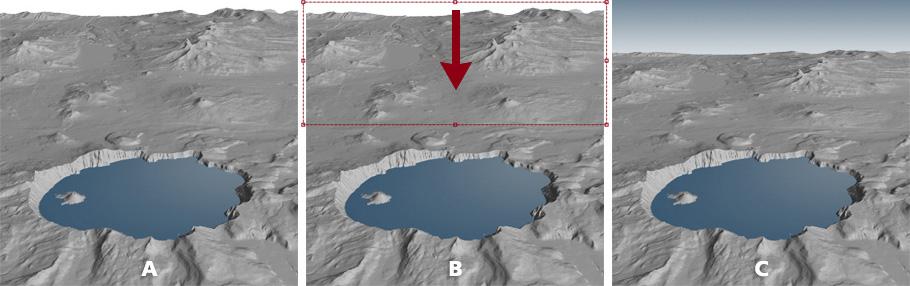
2) Transform selection This technique is similar to that used for Flight 93, but with one extra step. Starting with a truncated terrain, you will use the Transform Selection tool in Photoshop to compress background areas on the vertical axis. This will create a more compact scene that fits better in tight graphical layouts. The following steps refer to the lettered illustration below: A) Render a 3D scene looking in a cardinal direction—north, south, east, or west—as it is important to have the back edge of the terrain aligned perpendicular to the view direction. The back edge should also truncate just beyond a high feature, such as a mountain range, which will serve as the false horizon in the final scene. B) In Photoshop, use the Rectangular Marquee selection tool to select the background terrain in your scene, including the back edge. Try to place the front of the selection in an area with nondescript terrain. Next, in the Select drop menu, choose Transform Selection. Then click-drag the top of the selection down, which will compress the terrain. I usually repeat this process with two or three progressively shorter selections to apply increasingly greater compression near the horizon. C) In Photoshop, use the Magic Wand selection tool to select the empty area at the top, above the lowered horizon. Create a new layer. Then fill the selection from top to bottom with a blue-to-white gradient. You now have a basic sky above a false horizon. Note: Compressing the background causes mountains on the horizon to lose much of their height. If needed, use the Transform Selection technique again, but in the opposite direction, to elevate the mountains along a narrow strip at the horizon. |
||||||||||
 |
||||||||||
Compressing the background with Photoshop's Transform Selection tool moves the horizon down and makes room for the sky. |
||||||||||
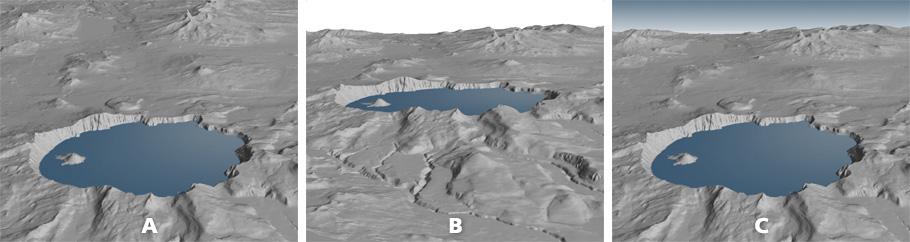
3) Merging terrains Another way to add a horizon and sky to your scene is by rendering multiple views of the same terrain in Natural Scene Designer Pro, then combining them in Photoshop. Start by rendering a high angle view that depicts the foreground in a map-like manner (see "A" in the illustration below). Then, without changing the camera direction, render one or more additional views at progressively shallower pitches that reveal the horizon (see "B" below). Next, in Photoshop, paste each of these renders into a file with the high angle view placed on the bottom layer and the shallow angle views above. Finally, use layer masks to blend these renders as a seamless scene with a visible horizon—oh, and add a blue sky with the gradient tool (see "C" below). Click here to download a layered Photoshop file to check out how I constructed the example below. |
||||||||||
 |
||||||||||
Merging terrain "A" with terrain "B" to create terrain "C" with a horizon and sky. |
||||||||||
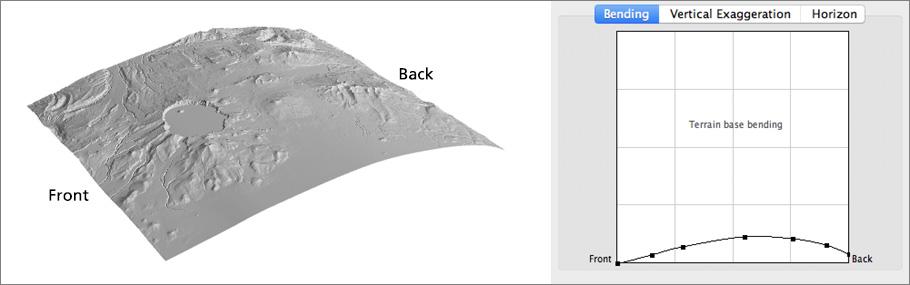
4) Terrain bending Warping your terrain on a convex arc with Terrain Bender software is an effective way of adding a horizon and sky to your scene, especially when there is a limited amount of elevation data in the background. Follow these steps: A) In Natural Scene Designer Pro, export your elevation data as an ASCII Grid DEM. B) Launch Terrain Bender and open the ASCII Grid DEM that you just exported. C) In Terrain Bender, adjust the curve histogram similar to what I did in the illustration below. Try to keep the front (foreground) relatively straight and gently curve the background down so that it disappears. Position the crest of the curve where you want the horizon to be. |
||||||||||
 |
||||||||||
Using Terrain Bender to interactively warp a digital elevation model. |
||||||||||
D) In Terrain Bender, when you are satisfied with the curve adjustment, export it as an ASCII Grid DEM. In the File menu, choose "Save Bent Terrain Model." E) Relaunch Natural Scene Designer Pro and import the bent terrain model. Use the camera window controls to frame the scene and position the horizon and sky (see illustration below). If the horizon and sky are not exactly where they should be, go back to Terrain Bender and adjust the curve as needed. |
||||||||||
 |
||||||||||
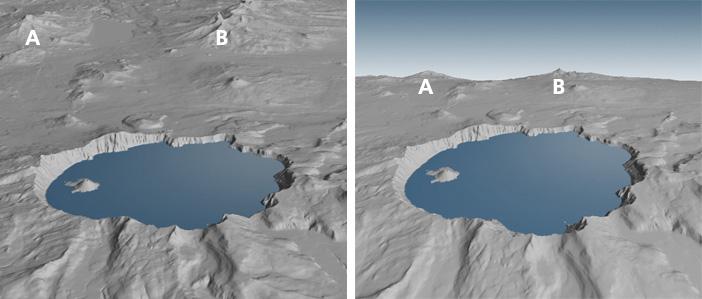
(left) A terrain before adjustments in Terrain Bender. (right) The same terrain with Terrain Bender adjustments. Note how the mountains at "A" and "B" break the horizon in the adjusted scene. |
||||||||||
 |
||||||||||
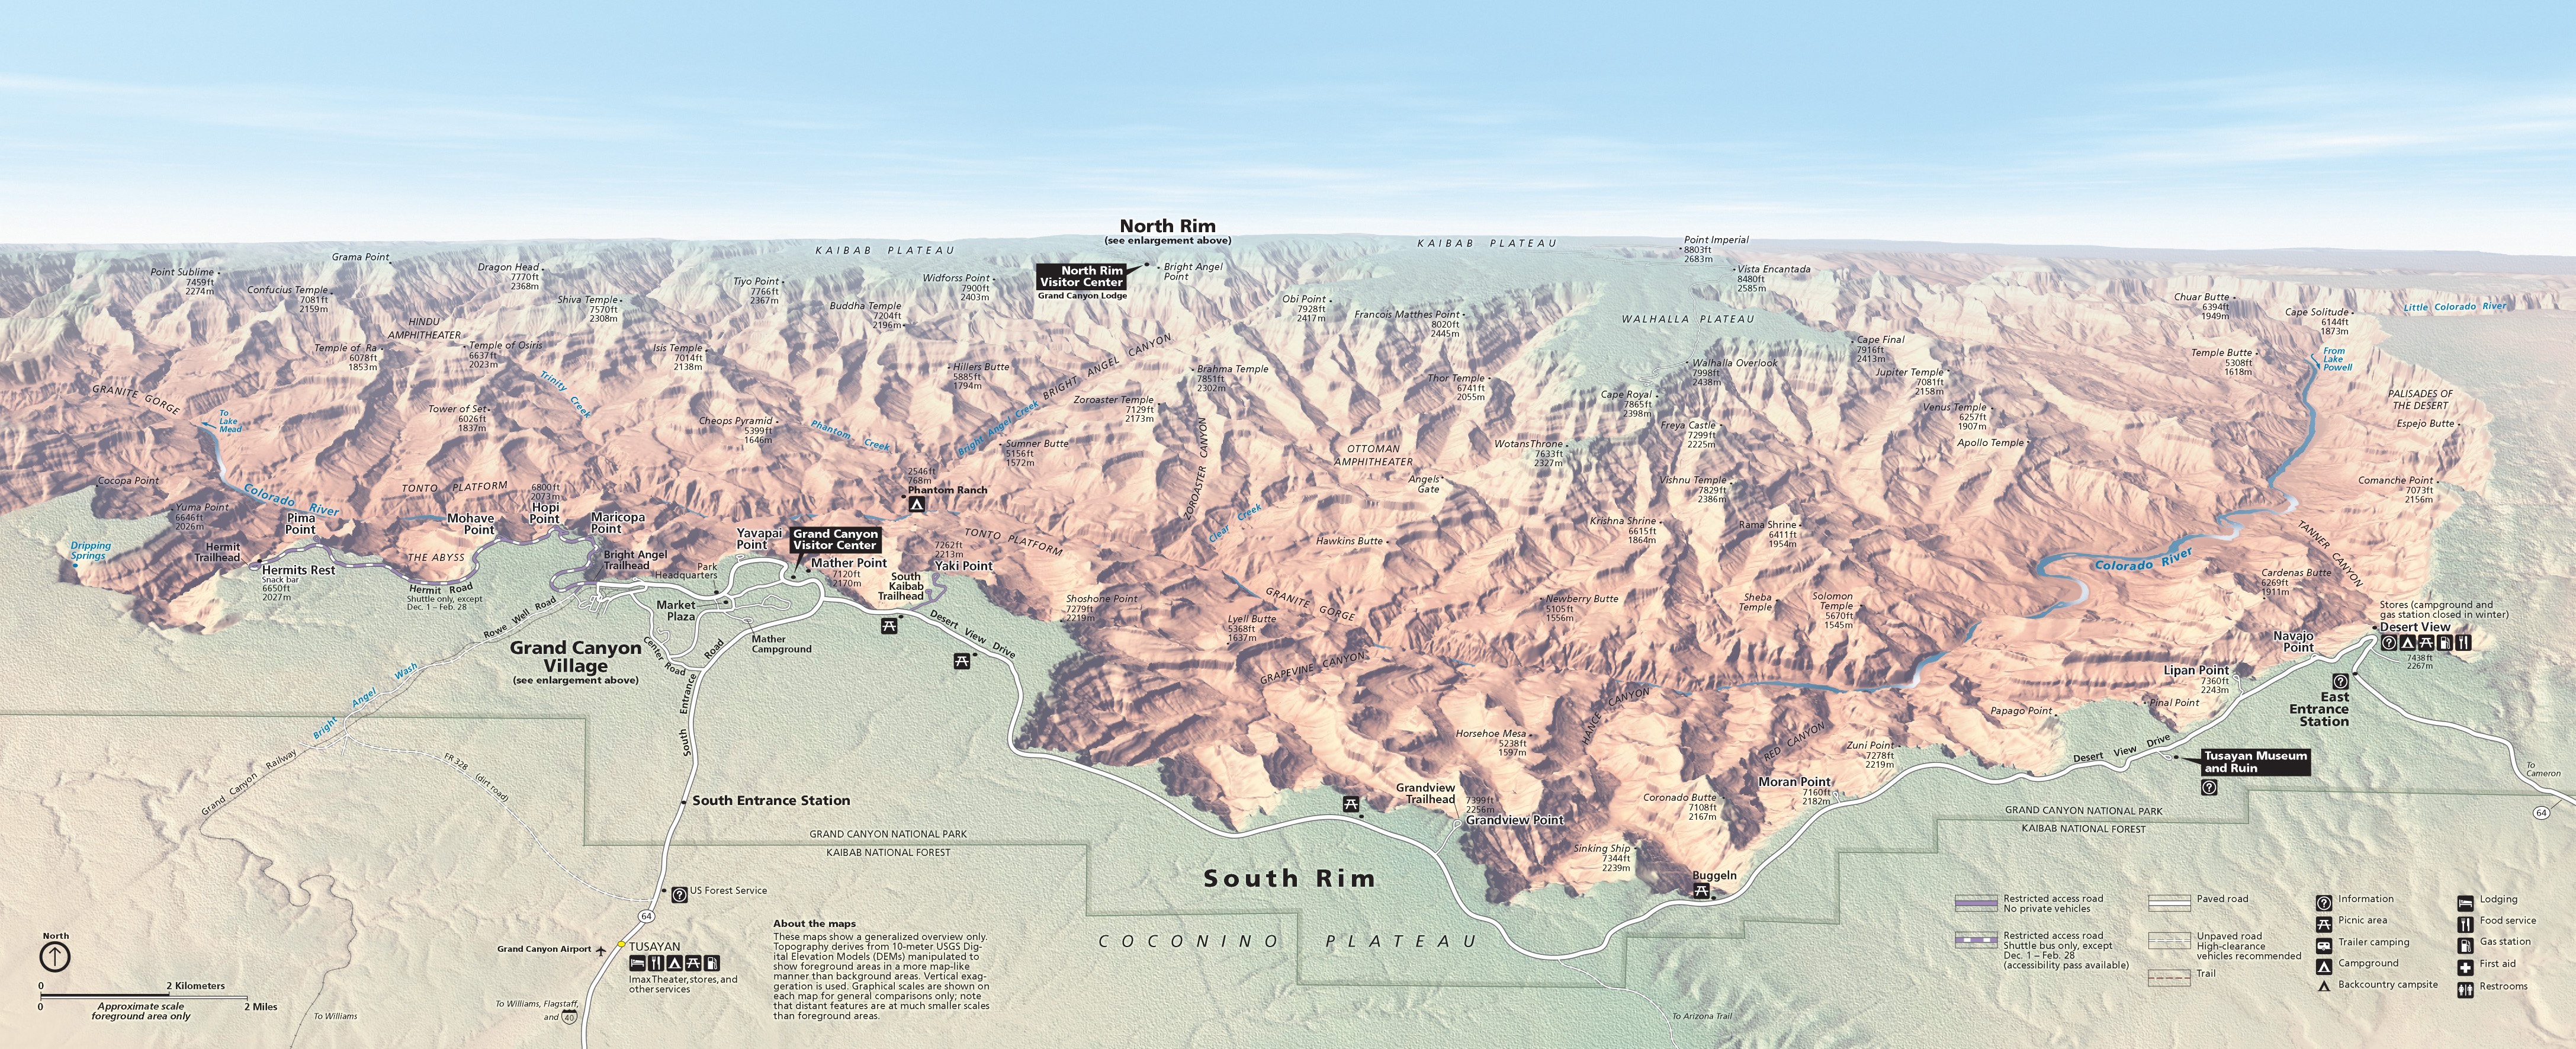
Grand Canyon, Arizona, created with elevation data warped to a convex arc. Foreground areas appear almost planimetric compared to background areas that flatten toward the horizon. (Click map to enlarge.) |
||||||||||
Terrain bending tips • In Natural Scene Designer Pro, changing the vertical exaggeration of a bent terrain influences both terrain surface features and the convex arc upon which they sit. • The direction of terrain bending in Terrain Bender must match the direction of view in Natural Scene Designer Pro. • Terrain Bender allows you to bend terrains for view directions other than from due north, south, east, and west. Rotate the direction of view as desired and then click the "Bend in Current View Direction" button. • The Natural Scene Designer "Create a Lake" tool does not work properly because bent terrains are no longer level. The same goes for ocean water. To show water bodies you must rely on draped image overlays. • You may experience data clipping when importing a bent terrain into Natural Scene Designer Pro. You can largely avoid this problem by bending terrains only slightly in Terrain Bender. In addition, try making curves adjustments near the bottom of the histogram, as shown here. |
||||||||||
 |
||||||||||